

Table of Contents
- How to Choose Precision Woodworking Tools That Earn Their Van Space
- Cabinet Installation Jigs: What to Look for Before You Buy
- CabinetMate Assembly Jigs: 90° and T-Joint Alignment Reviewed
- AlignPro Laser Level Markers: Giving Your Line Laser a Visible Reference
- Drilling Jigs and Spacer Gauges: Repeatable Holes and Even Gaps
- How to Remove Rust from Precision Hand Tools
- Frequently Asked Questions
Last Updated: September 25, 2026
How to Choose Precision Woodworking Tools That Earn Their Van Space
Precision woodworking tools are the instruments that hold, reference or guide a cut so the result repeats exactly, rather than depending on a steady hand and a fresh tape measurement. This guide from DeFrixo covers six cabinet fitting essentials and the criteria that separate a tool you reach for daily from one that rattles around the van for a year. Van space is expensive. Every tool in it should remove a decision, not add one.
Below, we cover the six tool types worth carrying, what to look for in each, and how to keep them working.
A common mistake is buying precision tools by brand reputation rather than by job.
Cabinet Installation Jigs: What to Look for Before You Buy
Cabinet installation jigs are alignment tools that hold panels or fronts in a fixed position while you fasten them, replacing the hand that would otherwise be clamping, steadying and reaching for a drill at the same time. Before buying, check four things: the panel thickness it is designed for, whether it includes screw guidance, how it behaves when you let go, and whether it suits the joints you actually cut.
- Panel thickness: Most kitchen carcasses use 18mm board. A jig built around that dimension sits flush and references the face properly.
- Screw guidance: Integrated guides stop the panel shifting as the bit bites. Without them, the first screw often pulls the joint out of line.
- Stability when released: Test whether the jig holds position unaided. If you still need a second pair of hands, it has not solved the problem.
- Joint coverage: Corners and T-joints are different problems. A corner jig will not align a middle shelf.
CabinetMate Assembly Jigs: 90° and T-Joint Alignment Reviewed
CabinetMate is a range of assembly jigs designed for standard 18mm boards, covering both corner joints and T-joints. The range splits into two jobs, and understanding which you need matters more than which bundle looks like better value.
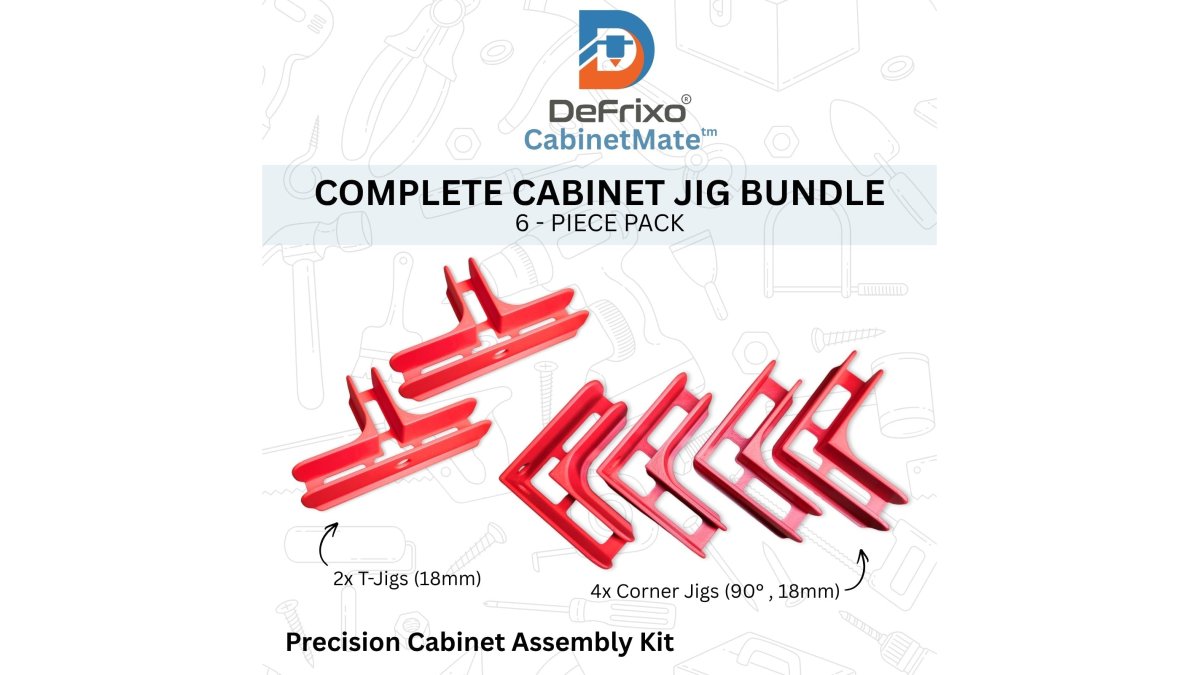
The jigs position and hold panels at 90 degrees during assembly and include screw guide functionality. They stabilise the panels while they are being joined. They do not guarantee a perfectly square finished cabinet, and they do not remove the need to check the assembly before it goes on the wall.

CabinetMate 90° Set of 4 and the 6-Piece Pro Bundle
The 90° set contains four corner positioning jigs with integrated screw guides, giving four-point support while you square up base and wall cabinet boxes. Four points matter because a single corner jig lets the opposite corner drift.
If you build complete carcasses rather than just corners, the 6-piece Pro Bundle adds two T-jigs to the four corner jigs. That combination covers standard boxes, centre partitions and full kitchen runs in one kit.
CabinetMate T-Jig Set of 2
The T-jig set addresses the joint most installers still hold by hand: aligning middle shelves, internal dividers and structural panels into a clean T. Two heavy-duty jigs give you a stable reference on both sides of the joint. The alternative is clamping, checking, re-checking and hoping the panel does not creep while you drive the screw.
AlignPro Laser Level Markers: Giving Your Line Laser a Visible Reference
AlignPro Laser Level Markers are reference blocks that give a separate line laser a visible, repeatable point to cross at each cabinet corner. They do not create, project or hold the laser line. A line laser produces the beam; the markers provide the fixed reference the beam lands on.

The workflow is straightforward. Place markers at the cabinet corners you need to compare. Position the line laser so the beam crosses one reference line on the first marker, then leave the laser alone. Adjust each cabinet corner until the beam crosses the same reference line on every marker.
A major advantage is visibility. When using the cabinet edge itself as a reference, the laser may be easy to see at the front but difficult or impossible to see at the rear. Placing AlignPro markers at the corners provides visible reference points at both the front and rear, making individual cabinet foot adjustment easier.
CabinetMate™ Cabinet Assembly Jigs →
Lightweight, Heavy Base, Magnetic and TallBoy Versions Compared
DeFrixo offers several versions for different working environments. Red markers provide strong contrast against green laser beams; green markers do the same against red beams.
Version |
Distinguishing feature |
Best suited to |
|---|---|---|
Lightweight |
Lightest build, easy to carry in quantity |
General cabinet and worktop runs |
Heavy Base |
10g metal core for improved stability |
Sites where markers get knocked |
Magnetic |
Magnetic core in the base for quick attachment |
Metal brackets, frames or screws |
TallBoy |
Raised reference heights at 120mm, 130mm and 140mm |
Floor levelling where the beam sits too high |
The TallBoy is purpose-built for floor work. On some floor levelling setups the beam sits too high for standard markers to be practical, particularly where lowering the laser is difficult or not possible. The TallBoy’s raised reference heights provide a suitable reference for these situations. For cabinet, worktop and general installs, the standard AlignPro markers are the right choice.
Drilling Jigs and Spacer Gauges: Repeatable Holes and Even Gaps
Drilling jigs and spacer gauges handle the two jobs that consume the most time on a kitchen fit: repeating a hole position across multiple fronts, and holding a consistent gap between them. Both remove measurement from the equation, which is where errors accumulate across a run of ten doors.
Handle drilling jigs repeat the same drilling position across cabinet doors and drawer fronts.

How to Remove Rust from Precision Hand Tools
Removing rust from precision hand tools comes down to matching the method to the damage: light surface bloom comes off with an abrasive pad and oil, while pitted corrosion needs a chemical treatment followed by re-protection. Precision tools are less forgiving than general workshop kit, because rust on a reference face or a guide bushing changes the geometry you rely on.
Work through the levels in order:
- Assess before you act. Surface bloom sits on top of the metal. Pitting has eaten into it. If a reference face or bushing is pitted, the tool's accuracy is compromised and cleaning will not restore it.
- Start with the least aggressive method. A fine abrasive pad with a light oil, worked along the grain of the finish, lifts surface rust without removing sound metal.
- Move to chemical removal for heavier rust. Apply a rust remover, leave it for the stated dwell time, then scrub and rinse thoroughly. Never leave residue in a bushing or moving part.
- Neutralise and dry completely. Any moisture left in a recess will start the cycle again within days.
- Re-protect immediately. A thin film of tool oil or a dry protective coating on machined surfaces. Silica gel packs in the case help if the van gets damp.
- Check the tool afterwards. Run it against a known reference. If a guide bushing or a 90-degree face no longer reads true, retire it.
Frequently Asked Questions
What are the most essential precision woodworking tools for cabinet installation?
For cabinet work, the essentials are assembly jigs that hold panels at 90°, a drilling jig for handle positions, spacer gauges for even drawer front gaps, and laser level markers for levelling runs. DeFrixo's CabinetMate jigs cover the assembly stage, the handle drilling jig repeats hole positions across fronts, the spacer gauge set controls 2mm, 3mm or 4mm gaps, and the AlignPro markers give your line laser visible reference points at each cabinet corner. Together they reduce repeated measuring and adjustment on site.
How do you maintain accuracy when fitting kitchen cabinets?
Accuracy comes from removing repeated measurement. Set your line laser once, place AlignPro markers at the cabinet corners, and adjust each corner until the beam crosses the same reference line on every marker. For assembly, CabinetMate jigs hold panels at 90° with integrated screw guides so boards do not shift while you fix them. Check the finished run with your own level as a final step. The tools create repeatable references.
Why is a laser level marker useful for joinery work?
A major advantage is visibility. When using the cabinet edge itself as a reference, the laser may be easy to see at the front but difficult or impossible to see at the rear. Placing AlignPro markers at the corners provides visible reference points at both the front and rear, making individual cabinet foot adjustment easier. They do not produce or hold the laser line themselves; they work alongside your line laser and do not replace your final level check.
How can I ensure consistent gaps when installing drawer fronts?
The Drawer Front Spacer Gauge Set includes 2mm, 3mm and 4mm gauges sized for 18mm panels. Slot the gauge between drawer fronts as you position each one, fix it, then move to the next. This gives a uniform reveal across the run without measuring every gap individually. Rounded corners help avoid marking the front surfaces. Pick one gap size at the start and keep it consistent across the whole cabinet.
How do you remove rust from precision hand tools?
Start with the gentlest method: rub light surface rust with fine abrasive pads or wire wool and a suitable lubricant, working along the grain of the metal. For heavier patches, a proprietary rust remover applied with a brush and left to work before wiping clean can help. Dry the tool thoroughly afterwards, then apply a thin coat of tool oil or wax. Store precision tools in a dry box or cabinet, and wipe them down after damp site days to slow rust returning.