

Table of Contents
- How Long a Kitchen Installation Actually Takes
- The Kitchen Fitting Stages, in Order
- Timeframes for Each Stage of the Timeline
- What Causes Delays in a Kitchen Installation Timeline
- How to Speed Up Kitchen Cabinet Installation Without Cutting Corners
- Precision Tools for Kitchen Installers That Protect the Schedule
- How to Plan a Kitchen Installation Schedule That Holds
- Frequently Asked Questions
Last Updated: 14 September 2026
How Long a Kitchen Installation Actually Takes
A straightforward kitchen installation often takes around five to ten working days on site, while larger or more complex renovations involving significant plumbing, electrical or building work can take two weeks or longer.
Most delays do not come from slow workmanship. They come from sequencing errors, missing first-fix services, and units that arrive before the room is ready for them. Understanding the order of operations is the single biggest factor in keeping a kitchen installation timeline on track, and it is where most schedules quietly fall apart.
Below, we walk through each stage in order, give realistic timeframes, explain what pushes a job off course, and show how precision tools for kitchen installers help protect the schedule when the pressure is on.
The Kitchen Fitting Stages, in Order
The kitchen fitting stages follow a fixed sequence: strip-out, first fix, plastering and making good, unit installation, worktop templating and fitting, finishing, and final connection. Skipping ahead in that order is the most common cause of rework.
Each stage depends on the one before it. Units cannot go in until the walls and floor are sound. Worktops cannot be templated until the base units are set and level. Appliances cannot be commissioned until the services are live. Treat the sequence as a chain, and the timeline becomes predictable.
Strip-Out and First Fix
Strip-out and first fix usually take two to four days for a standard domestic kitchen (Electrical installation regulations: don’t get left with unregistered electrical work). This phase covers removing the old units, isolating and rerouting gas, water and electrical supplies, and preparing the room for new carcasses.
It is unglamorous work, and it is where the schedule is won or lost. A common mistake is underestimating how long making good takes once old tiles and units come away from the wall. Plaster repairs, floor levelling and any damp treatment all sit here, and none of them can be rushed.
Gas work must be carried out by a Gas Safe registered engineer, and electrical alterations should follow the requirements set out in the IET Wiring Regulations. Confirm these trades are booked before strip-out begins. Waiting for the appropriate Gas Safe registered engineer to complete required gas work or final appliance connections can create an avoidable delay if the trade has not been booked in advance.
Units, Worktops and Finishing
Unit installation, worktop fitting and finishing typically take five to ten working days. This is the visible phase, and the one clients judge the whole project by.
Once the base units are level and fixed, bespoke stone or solid surface worktops may be templated before manufacture and fitting, while builder fitted worktops such as many laminate options can be cut and fitted on site.
What most guides miss is how much of this phase depends on the room being genuinely square and level. If the floor runs out, every carcass needs individual adjustment, and that eats hours across a full run.
Timeframes for Each Stage of the Timeline
A realistic schedule for a standard domestic kitchen looks like this. Use it as a planning baseline, then adjust for room size, service alterations and access.
Stage |
Typical Duration |
Depends On |
|---|---|---|
Strip-out and first fix |
2-4 days |
Access, service isolation |
Plastering and making good |
1-3 days |
Wall and floor condition |
Base and wall unit installation |
2-3 days |
Level floor, sound walls |
Worktop template and fit |
1-3 days |
Units set and level |
Doors, fronts and handles |
1-2 days |
Carcasses fixed |
Finishing and sealing |
1-2 days |
Worktop and units complete |
Appliance connection and handover |
1 day |
Live services, certification |
Small galley kitchens can compress this considerably. Larger rooms with islands, breakfast bars or extensive service rerouting will stretch it. The table is a baseline, not a promise.
What Causes Delays in a Kitchen Installation Timeline
Delays almost always trace back to one of five causes: late deliveries, incomplete first fix, out-of-level rooms, missing decisions from the client, and trades booked too far apart.
The delivery problem is the most frustrating because it is entirely preventable. Units, worktops and appliances should be ordered with lead times confirmed in writing, and nothing should be booked for installation until the stock is physically on site or confirmed for a specific day.
Out-of-level rooms are the second big one. A floor that runs out by even a small amount across a full run of units means every carcass needs individual adjustment, and the worktop template has to account for the variance. Checking floor and wall levels before ordering is basic due diligence.
Client decisions stall jobs more than most fitters admit. Handle choice, splashback material, appliance models and socket positions all need locking down before the relevant stage begins. Chasing a decision mid-install is dead time.
How to Speed Up Kitchen Cabinet Installation Without Cutting Corners
Speeding up kitchen cabinet installation comes down to preparation and repeatability, not rushing the physical work. The fitters who finish early are the ones who set up properly before the first carcass goes in.
A practical approach:
- Confirm all deliveries are on site or dated before strip-out begins
- Check floor and wall levels and record any variance before ordering
- Pre-build and pre-drill carcasses where the workshop allows
- Set a consistent datum line for the whole run before fixing anything
- Group similar tasks together rather than switching between them
- Keep a dedicated snagging list and work it once, at the end
The datum line is the one that matters most. If every unit is set against the same reference, alignment stops being a series of individual judgements and becomes a repeatable process. That is the difference between a run that goes in cleanly and one that needs constant correction.
Precision Tools for Kitchen Installers That Protect the Schedule
Precision tools for kitchen installers protect the schedule by removing repeat measurement and guesswork from the alignment stages. The less time spent re-checking and re-adjusting, the less chance the job runs over.
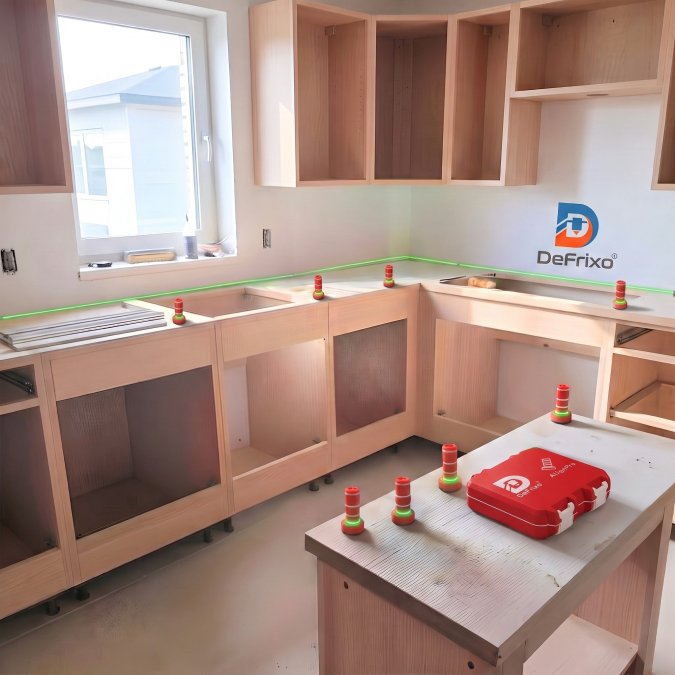
This is where DeFrixo's AlignPro Laser Level Markers earn their place in the van. They do not produce a laser line themselves; a separate line laser does that. Instead, the markers are manufactured to consistent heights with fixed reference lines, giving you visible, repeatable reference points at several cabinet positions simultaneously.

The workflow is straightforward. Place markers at the cabinet corners you need to compare. Position the line laser so it crosses one reference line on the first marker, then leave the laser alone. Adjust each cabinet corner until the laser crosses the same reference line on every marker. The advantage is visibility: when you use the cabinet edge itself, the laser can be easy to read at the front and near-impossible at the rear. Markers at the corners give you a clear reference at both ends, which makes individual foot adjustment far quicker.
AlignPro markers complement a line laser rather than replacing it, and they do not replace your final level check. Versions include Lightweight, Heavy Base and Magnetic options, with red markers built for contrast against green laser beams and green markers for red beams.
How to Plan a Kitchen Installation Schedule That Holds
A schedule that holds is built backwards from the handover date, with buffer time attached to the stages most likely to slip. Working forwards from day one feels organised, but it hides the pressure until it is too late to absorb it.
Start with the fixed points: gas and electrical certification, worktop templating, and appliance commissioning. These have hard dependencies and external trades attached, so they anchor everything else. Build the rest of the kitchen installation timeline around them, then add buffer to strip-out and making good, which are the two stages most likely to reveal surprises.
For teams running several kitchens a month, standardising the tool kit and the alignment method across every job pays off over time. Repeatable processes mean new team members get up to speed faster, and the schedule stops depending on one experienced fitter being on site.
Kitchen installations rarely fail because of slow work. They fail because the sequence is broken, the room was never checked properly, or a decision arrived three days late. Tightening the alignment stages is the fastest way to claw that time back, and it is exactly what DeFrixo's tools are built for. AlignPro Laser Level Markers give you repeatable reference points across every cabinet corner, with Lightweight, Heavy Base and Magnetic versions to suit the way you work, plus red and green options for clear contrast against your laser beam. Shop Laser Level Markers at DeFrixo and keep your next kitchen installation timeline on schedule.

Frequently Asked Questions
How long does a typical kitchen installation take?
Most straightforward kitchen replacements run to roughly five to ten working days on site. A like-for-like swap with services already in place sits at the shorter end. Projects that move plumbing, add circuits or involve structural work stretch further because each trade has to finish before the next can start. Treat any single figure as a starting point, then add time for the unknowns your survey turns up.
What are the main kitchen fitting stages?
The sequence runs strip-out, first fix of electrics and plumbing, plastering and decorating, unit assembly and levelling, worktop templating and fitting, then tiling, appliances and snagging. Each stage depends on the one before it, so a delay early on pushes everything back. Knowing the order helps you book trades at the right moment instead of holding up the whole job.
What causes most delays in a kitchen installation timeline?
Late deliveries and hidden problems behind the old units cause the biggest overruns. Uneven floors and walls that are out of square also cost time, because cabinets have to be packed and scribed rather than simply set down. Booking trades in the wrong order adds further slippage. Confirming delivery dates and checking the room before strip-out removes most of the risk.
Can precision tools for kitchen installers really shorten the schedule?
They remove repeated measuring and rework rather than the work itself.AlignPro laser level markers, for example, give matching visible reference points at each cabinet corner so the feet can be adjusted onto the same level plane. CabinetMate holds panels at 90 degrees during assembly. Neither replaces your final level check, but both cut the back-and-forth that eats into a day.