

Last Updated: 27 October 2026
Quick Summary
Using laser levels for kitchen fitting means setting one datum line from the highest floor point, then never moving the laser again. You adjust each cabinet foot until the beam crosses the same reference line on markers at every corner, checking front and rear.
- Set the datum from the highest point of the floor, because you cannot level a cabinet downwards into a dip.
- Mark the datum height on the wall in pencil as a backup in case the laser gets knocked.
- Set the rear cabinet feet first, since they are hardest to reach later, then match the front.
- Correct cabinet twist by adjusting the feet in pairs rather than one at a time.
- Red markers give strong contrast against green laser beams, and green markers against red beams.
Table of Contents
- What You Need Before You Start
- Step 1: Set the Datum Line and Establish Your Laser Level for Cabinet Installation
- Step 2: How to Set Out Wall Cabinets Against the Laser Line
- Step 3: How to Level Kitchen Cabinets Along a Run
- Step 4: Levelling Kitchen Cabinet Feet at Every Corner
- Step 5: Using Laser Levels to Check Front-to-Back Alignment
- Common Mistakes When Using Laser Levels for Kitchen Fitting
- Shop Laser Level Markers for Your Next Fit
- Frequently Asked Questions
What You Need Before You Start
Using laser levels for kitchen fitting starts with one fixed reference point, not with the cabinets. Get the datum right and every later step has something solid to work from.
Here is what to have on site before you begin:
- A line laser that projects a horizontal line
- A tripod or a stable surface to mount it on
- A tape measure and a pencil
- A spirit level for final checks
- Shims, packers and cabinet feet
- AlignPro laser level markers
A line laser may be easier to see at the front edge of a cabinet than at the rear. Markers give you a visible reference at both ends.
If you want to see the range before you start, browse the laser level markers.
Step 1: Set the Datum Line and Establish Your Laser Level for Cabinet Installation
“First find the highest point of the floor and establish the required cabinet top datum from that point. Then position the line laser at a convenient height where the beam crosses one of the reference lines on your markers. Keep the laser fixed while levelling that cabinet run. The highest point matters because you cannot level a cabinet downwards into a dip. You build up from the high spot.
Mount the laser on a tripod at a convenient height so the beam crosses one reference line on your first marker. Do not move the laser after this point. Every later adjustment is made to the cabinet, never to the laser.
Mark the datum height on the wall in pencil as a backup. If the laser gets knocked, you can reset it to the same line.
Step 2: How to Set Out Wall Cabinets Against the Laser Line
Setting out wall cabinets means transferring the laser line to the wall as a physical mark, then working from that mark rather than from the floor. Wall cabinets hang, so the datum you set in Step 1 gives you a consistent height to hang from.
Work through it in this order:
- Measure up from the datum to your required cabinet top height
- Mark that height at both ends of the run
- Snap or draw a line between the marks
- Check the line against the laser before drilling
Measuring each cabinet position separately from the floor can lead to inconsistent measurements. One line, marked once, used everywhere, keeps the run consistent.
Step 3: How to Level Kitchen Cabinets Along a Run
Levelling kitchen cabinets along a run means bringing every unit onto the same horizontal plane, checked against one laser line rather than against each other. Cabinets lined up with their neighbours can still be collectively out of level.
Place a marker at each cabinet corner you need to compare. Set the laser so it crosses the same reference line on the first marker. Then adjust each cabinet foot or packer until the laser crosses that same line on every marker.
This is where the visibility advantage shows up. With markers at the front and rear corners, you can see where each corner sits without crouching behind the unit.
For a deeper walkthrough on speed, read our guide on how to level kitchen cabinets quickly.
Step 4: Levelling Kitchen Cabinet Feet at Every Corner
Adjust the cabinet feet as required, checking each front and rear corner against the same laser reference. Make small adjustments and recheck all corners after each change, because altering one foot can affect the rest of the cabinet. Continue until every required reference point matches the same line.
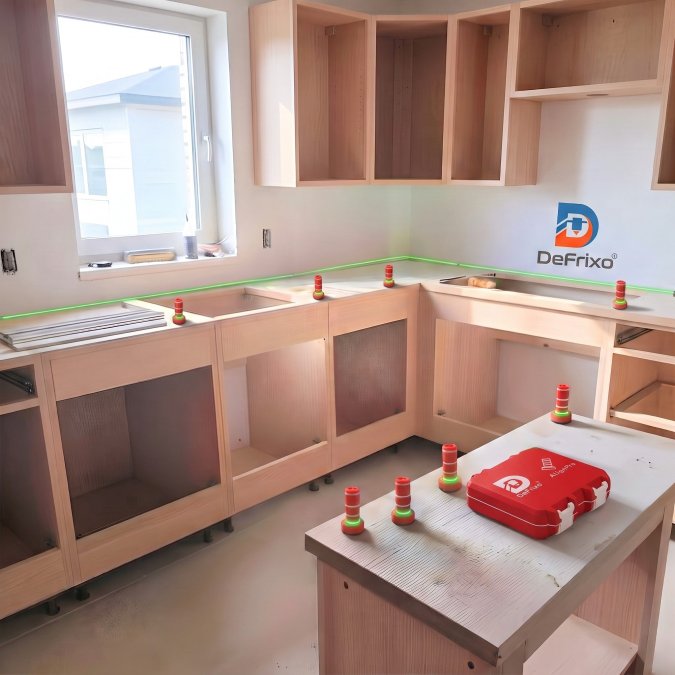
AlignPro™ Lightweight Laser Level Markers – Cabinet & Worktop Installation Tool →
Step 5: Using Laser Levels to Check Front-to-Back Alignment
Front-to-back alignment checks that the cabinet face and rear sit square to the run, not just level. A cabinet can be level and still be twisted.
Place a marker at the front corner and another at the rear corner of the same cabinet. With the laser set, both should read the same reference line. If the front reads true and the rear does not, the unit is twisted.
If the cabinet is twisted, identify which corner is high or low and adjust the appropriate foot gradually, rechecking all four corners as you work.
Common Mistakes When Using Laser Levels for Kitchen Fitting
Moving the laser mid-job changes the reference. Once the beam is set, do not move it. Make adjustments to the cabinet.
Other errors include:
- Setting the datum from the lowest floor point. You cannot build down into a dip. Start from the highest point.
- Measuring each cabinet from the floor. Floors vary. Measure from the laser line.
- Relying on the cabinet edge as a reference. It is visible at the front and often invisible at the rear.
- Skipping the final spirit level check. Markers and lasers guide the work; they do not replace your own check.
- Leaving the laser on a loose surface. A knocked tripod wastes more time than it saves.
Our guide on reducing kitchen fitting rework covers the topic.
Shop Laser Level Markers for Your Next Fit
AlignPro markers do not create or project the laser line. A separate line laser does that. What the markers do is give you matching, visible reference points at several cabinet corners at once, so you can bring them all onto the same plane.
They are available in three versions:
Version |
Key Detail |
Best For |
|---|---|---|
Lightweight |
Light and easy to carry |
Everyday installs and quick setups |
Heavy Base |
Heavier base for stability |
Where extra weight improves grip |
Magnetic |
Magnetic core in the base |
Metal frames, studs and brackets |
Red markers give strong contrast against green laser beams. Green markers do the same against red beams. Sets come in 5, 10 or 20.
Markers work alongside your line laser and your own judgement. They do not replace either.
Frequently Asked Questions
How do you use a laser level to install kitchen cabinets?
Set a datum line at a convenient height, then position a line laser so the beam crosses one reference line on a marker at the first cabinet corner. Without moving the laser, adjust each cabinet foot until the beam crosses the same reference line on every marker. This gives you repeatable reference points at front and rear corners. Always finish with a spirit level check before fixing units in place.
Do you still need to check cabinets with a spirit level after using a laser?
Yes. A laser level and markers speed up alignment, but they do not replace your final check. Use a spirit level across cabinet tops, along the front edge and diagonally across carcasses to confirm everything is level and square. Laser levels for kitchen fitting are a reference aid, not a substitute for professional judgement.
Where should you position a laser level when fitting kitchen cabinets?
Position the laser at a height where the beam crosses one of the fixed reference lines on your markers. Do not move it once you have set your reference. Placing markers at front and rear corners gives you visible points at both ends of each cabinet.
What type of laser level is best for kitchen fitting?
Pair a line laser with markers that contrast with its beam colour: red markers for green beams, green markers for red beams.
Kitchen fitting rewards repeatability, and repeatability starts with one fixed reference you trust. If you are tired of balancing a laser on whatever is to hand and rechecking the same corners, AlignPro markers give you matching reference points at every corner of the run. They are compact, built for repeated site use, and come with free delivery and 30-day returns. Get started with DeFrixo and take the guesswork out of your next fit by picking up the AlignPro trade pack.

