

Table of Contents
- Why Rework Happens: The Real Cost of Getting It Wrong
- Stage 1: Planning the Kitchen Installation Timeline to Avoid Bottlenecks
- Stage 2: Measuring and Marking Without Repeat Visits
- Stage 3: Cabinet Alignment Techniques That Hold Their Setting
- Stage 4: How to Level Kitchen Cabinets Across a Full Run
- Stage 5: Professional Kitchen Fitting Tools That Cut Repeat Work
- The Rework Checklist: Common Causes and How to Catch Them Early
- Frequently Asked Questions
Last Updated: September 30, 2026
Why Rework Happens: The Real Cost of Getting It Wrong
Most kitchen fitting rework traces back to one root cause: a decision made too early, before the room was truly understood. A cabinet run set out from a single corner. A service void assumed rather than checked. A laser height picked at random and never repeated. Each shortcut feels harmless on day one. By the time the worktops are templated, it has become an expensive rebuild.
This guide from DeFrixo breaks down where kitchen fitting rework actually comes from, stage by stage, and how to stop it before it starts.
Rework rarely announces itself. It hides in small things:
- A 4mm gap that grows along a drawer bank
- A handle line that drifts across six doors
- A base unit that sits 3mm proud of its neighbour
- A plinth that will not sit flat because one foot is overextended
None of these are dramatic. Together, they turn a two-day install into a four-day one, and the customer notices every one of them.
Stage 1: Planning the Kitchen Installation Timeline to Avoid Bottlenecks
Build the kitchen installation timeline around dependencies, not around how long each task feels like it should take. The units cannot be levelled until the floor is clear and the services are capped. The worktop cannot be templated until every base unit is set and fixed. Get the order wrong and you will revisit work you already finished.
A practical sequence looks like this:
- Strip out and check the floor for level and flatness
- Confirm services, isolation points and any boxing requirements
- Set out the run and mark the level plane
- Assemble and position base units
- Level and fix the full run
- Template the worktop
- Fit doors, drawer fronts and handles
- Fit plinths, cornice and finishing trim
Two rules save the most repeat visits. First, never template a worktop on an unlevelled run. Second, never drill a single handle until every door on that elevation is hung and adjusted.
If you are waiting on a specialist trade, book them against the sequence above rather than a fixed date. A tiler arriving before the units are set will be back a second time.
Stage 2: Measuring and Marking Without Repeat Visits
Measure twice, mark once, and mark in a way you can still trust three hours later. Repeat visits almost always come from marks that were rubbed off, assumed, or never written down in the first place.
A few habits cut this down sharply:
- Record every measurement in a notebook, not on the back of your hand
- Mark datum lines in pencil and re-check them before cutting
- Photograph the set-out before units go in
- Note which wall is out of square and by how much
- Check for pipes and cables before drilling anywhere
The rear of a cabinet run is where marking falls apart. You can see a mark at the front of a unit. At the back, against a wall, in shadow, you often cannot. That is where a physical reference point earns its place.
Stage 3: Cabinet Alignment Techniques That Hold Their Setting
Cabinet alignment techniques only work if the panels are held still while they are fixed. Movement during drilling is a common cause of joints moving out of alignment.
When assembling a carcase, hold the panels at a true 90 degrees before the screws go in. Clamping by eye rarely holds. A jig that supports the joint at four points and guides the screw helps keep the panel in position while it is fixed, making accurate assembly easier. The completed carcass should still be checked for square..
The same principle applies to fronts. A door hung on a hinge with play will move as you tighten it. Set the gap, hold it, then fix.
AlignPro™ Lightweight Laser Level →
What most guides miss is that alignment is a sequence, not a single action. You set the carcase, then the run, then the fronts, then the gaps. Each stage locks the one before it. Skip a stage and the next one has nothing solid to build on.
Stage 4: How to Level Kitchen Cabinets Across a Full Run
To level kitchen cabinets across a full run, establish one level plane first, then bring every cabinet corner onto it. The mistake is adjusting feet one unit at a time and hoping the run ends up flat.
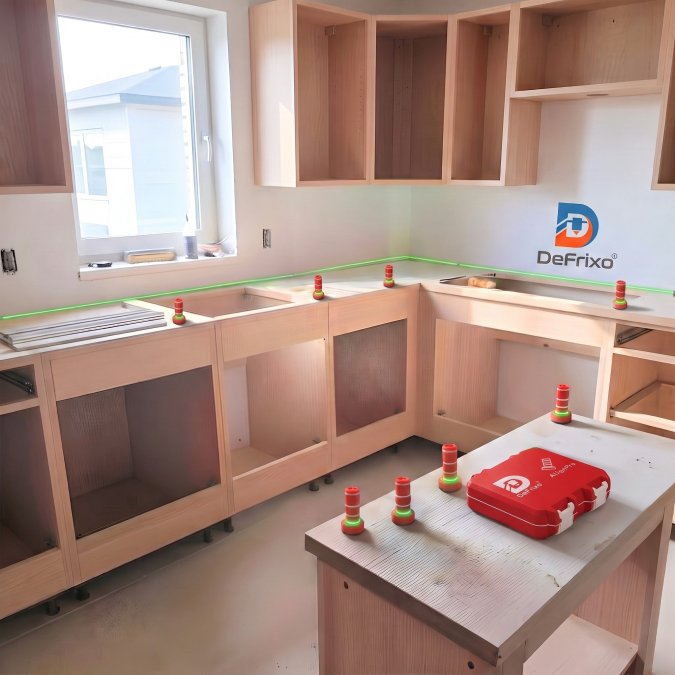
Here is a method that holds:
- Set your line laser at a convenient height so the beam crosses a reference line on your first marker
- Do not move the laser again
- Place markers at the front and rear corners of each unit
- Adjust each foot until the beam crosses the same reference line on every marker
- Re-check the whole run before fixing anything down
The visibility point matters more than it sounds. Using the cabinet edge as your reference works at the front, where you can see the beam. At the rear, against a wall, the beam is often invisible. A marker gives you a visible target at both ends.
AlignPro Laser Level Markers are made to consistent heights with fixed reference lines, so the same line means the same height at every position. They work alongside your line laser, and they do not replace your final level check.

Stage 5: Professional Kitchen Fitting Tools That Cut Repeat Work
Professional kitchen fitting tools reduce repeat work by making the same result repeatable, rather than relying on a good eye each time. The gain is not speed for its own sake. It is fewer returns to a job you already thought was finished.
Task |
What Goes Wrong |
Tool That Helps |
Repeat Work It Prevents |
|---|---|---|---|
Levelling a run |
Rear corners hard to see |
AlignPro Laser Level Markers |
Re-levelling after worktop template |
Assembling carcases |
Panels shift while fixing |
Squaring checks and re-fixing |
|
Setting drawer gaps |
Gaps vary across a bank |
Drawer Front Spacer Gauges |
Removing and re-hanging fronts |
Drilling handles |
Hole positions drift |
Handle Drilling Jig |
Filling and redrilling doors |
The pattern is consistent. Each tool removes a measurement you would otherwise repeat, and each one holds a setting while you fix it.

DeFrixo designs these tools for cabinet fitting and woodworking, with the aim of making results repeatable across a whole run rather than just at the first unit.
The Rework Checklist: Common Causes and How to Catch Them Early
Run this checklist before you leave each stage. Catching a problem here costs minutes. Catching it at handover costs a return visit.
- Floor checked for level and flatness before units arrive
- Services and isolation points confirmed and marked
- Level plane set with a laser and not moved
- Reference points visible at front and rear of every unit
- Full run levelled before worktop templating
- Carcases assembled and checked for square
- Doors hung and adjusted before any handle is drilled
- Drawer gaps set with a gauge, not by eye
- Handle positions repeated across every front
- Final level check completed before sign-off
Most of these are checks, not tasks.
Frequently Asked Questions
What are the most common causes of kitchen fitting rework?
Most rework traces back to four things: inaccurate first measurements, cabinets set level individually rather than as a run, handle and door positions drilled from fresh marks each time, and drawer fronts spaced by eye. Each one is a repeatable process failure rather than a skill problem. Fixing the process, with a consistent reference point and repeatable tooling, removes the cause instead of correcting the symptom after the units are fixed in place.
How can precision tools improve kitchen installation efficiency?
Precision tools remove the repeated measuring and rechecking that eats into a fitting day. A handle drilling jig with fixed guide bushings lets you drill the same position across multiple doors without marking each one. Spacer gauges hold a consistent gap on drawer fronts. Laser level markers give matching visible reference points at cabinet corners so you can bring several units onto the same plane without walking the run with a spirit level each time.
What is the best way to ensure cabinet alignment during installation?
Establish one fixed level datum for the whole run, then bring every cabinet to that reference rather than levelling each one in isolation. Position a line laser so it crosses one reference line on a marker at the first cabinet corner, leave the laser untouched, and adjust each remaining corner until the laser crosses the same line on every marker. This gives you a single consistent reference across front and rear corners, which is where alignment usually drifts.
How do you avoid measuring errors when fitting kitchen cabinets?
Reduce the number of measurements rather than trying to take them more carefully. Use jigs and gauges that carry the dimension for you: a drilling template for handle centres, spacer gauges for drawer gaps, and markers that hold a fixed height reference. Where you must measure, work from one datum point across the whole run instead of measuring each unit from the last, so a small error cannot accumulate along the wall.