

Table of Contents
- Why Clear Laser Referencing Eliminates Guesswork
- Cabinet Installation Levelling Techniques That Actually Work
- Using Laser Level Markers for Joinery and Cabinet Runs
- How to Use Cabinet Assembly Jigs Alongside Your Laser Setup
- Common Mistakes That Reintroduce Guesswork
- Choosing the Right AlignPro Markers for Your Workflow
- Frequently Asked Questions
Last Updated: September 13, 2026
Why Clear Laser Referencing Eliminates Guesswork
Clear laser referencing is the practice of giving a line laser a fixed, visible point to read against at every position along a cabinet run, rather than relying on sight, memory or a tape measure. It matters because the laser itself is only half the system: A line laser already provides a consistent level plane, but a clear reference at each cabinet position makes it much easier to compare multiple corners accurately.. This guide from DeFrixo covers how UK fitters set up referencing that holds across a full run of units.
The core problem is visibility. A laser line may be easy to read at the front edge of a cabinet but much harder to reference at the rear because the cabinet itself can obstruct the beam or there may be no clear surface to read it against. When the reference point disappears, the fitter falls back on estimation, and estimation is where rework begins.
Below, we'll show you exactly how to set a datum, adjust feet in a fixed sequence, and use markers so the beam reads the same at every corner of the run.
Cabinet Installation Levelling Techniques That Actually Work
Cabinet installation levelling techniques fall into two groups: those that give you a fixed reference to work from, and those that rely on repeated measurement. The first group is faster and more repeatable. The second group is where most uneven runs originate.
Setting a Datum Line Before You Touch a Cabinet
A datum line is a single horizontal reference, marked once, that every subsequent measurement and adjustment is taken from (bsigroup.com). Set it before any cabinet goes down. Pick a height that clears the tallest foot adjustment you expect, mark it around the room with your laser, and treat it as fixed for the duration of the job.
The discipline here is refusing to move it. Once the datum shifts, every reading taken from it is void. Fitters who re-set the datum mid-job to "make things easier" are the same fitters who end up re-levelling units they already signed off.
Adjusting Feet in Sequence, Not by Eye
Work the run in one direction and adjust each cabinet's feet against the same reference. Find the highest point of the floor first and establish the cabinet top datum from that point. Then adjust the remaining cabinets to the same level reference.
A sensible sequence:
- Set the first unit against the datum, front and back
- Bring the second unit to the same reference before locking its feet
- Check the joint line between the two, not just each unit individually
- Continue along the run, re-checking the previous joint as you go
The rear feet are what catch people out. You can see the front edge clearly and the back edge not at all, so the rear adjustment becomes guesswork. That blind spot can easily lead to additional adjustment later if the rear corners are not checked accurately.
Using Laser Level Markers for Joinery and Cabinet Runs
Laser level markers are small blocks with fixed reference lines at consistent heights. They do not produce or hold the laser line; a separate line laser does that. Their job is to give the beam something visible to cross at several cabinet positions at once.
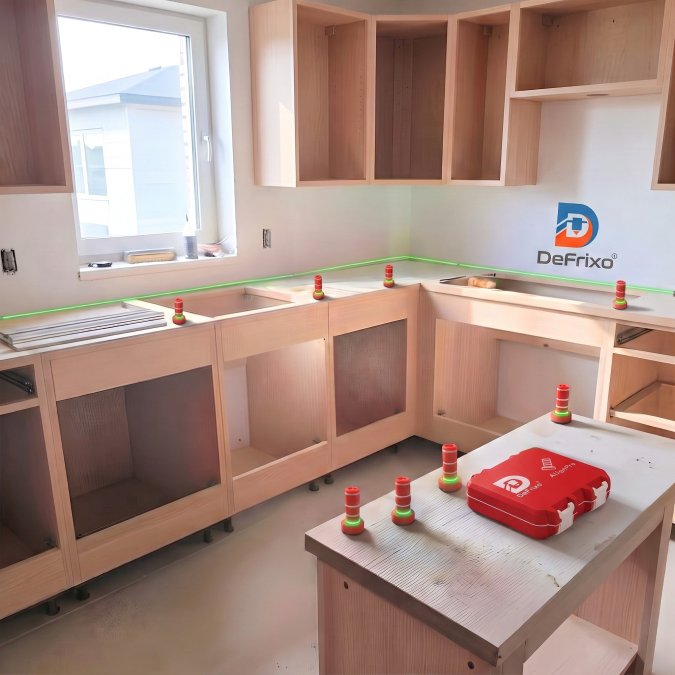
How AlignPro Markers Create Visible Reference Points
Place AlignPro markers at the cabinet corners you need to compare. Position the line laser so the beam crosses one reference line on the first marker, then leave the laser alone. Adjust each cabinet corner until the beam crosses the same reference line on every marker.
That is the whole method, and it solves the visibility problem directly. Instead of trying to read a laser against a cabinet edge that vanishes into shadow at the rear, you have a visible marked point at both front and rear. Individual foot adjustment becomes a matter of bringing the beam onto the same line, not squinting at an edge.
AlignPro markers do not replace your line laser, and they do not replace your final level check. They sit between the two: a repeatable reference that makes the adjustment step consistent.
Choosing Between Lightweight, Heavy Base and Magnetic Versions
DeFrixo builds three main versions for different site conditions. The Lightweight version is the general-purpose option and the easiest to carry in a full kit. The Heavy Base version adds a weighted base for stability where the marker is more likely to be knocked. The Magnetic version has a magnetic core in the base so it can attach to metal surfaces such as frames, brackets or screws.

Colour matters too. Red markers give strong contrast against a green laser beam, and green markers give strong contrast against a red beam (Research on the Accessibility of Different Colour Schemes for Web Resources for People...). Match the marker to the beam you actually run.
Version |
Best For |
Key Difference |
|---|---|---|
Lightweight |
Everyday installs, working on the move |
Lightest to carry |
Heavy Base |
Runs where markers get knocked |
Weighted base for stability |
Magnetic |
Metal frames, brackets and screws |
Magnetic core in the base |
TallBoy Heavy Base |
Floor levelling where the beam sits high |
Raised reference heights |
The TallBoy is a specific case. It exists for floor levelling setups where the beam sits too high for standard markers to read against. It is built for floor work rather than general cabinet and worktop installs, and the standard markers remain the right choice for those.
How to Use Cabinet Assembly Jigs Alongside Your Laser Setup
Cabinet assembly jigs and laser referencing solve different halves of the same job, and using them together is where the workflow tightens up. The jig handles panel alignment during assembly; the laser setup handles the level plane once the carcass is standing.
CabinetMate is a cabinet assembly jig that helps position and hold cabinet panels at 90 degrees while they are being joined, and it includes screw guide functionality so the fixing positions stay consistent. It stabilises the panels during assembly. It does not guarantee that the finished cabinet will be perfectly square, and it does not remove the need to verify the assembly afterwards, so check the carcass before it goes into the run.
The practical sequence looks like this:
- Assemble the carcass with the jig holding panels at 90 degrees
- Verify the assembly before it leaves the bench
- Stand the unit and set it against your datum
- Use markers at the corners to bring it onto the same reference line as its neighbours
Drawer front spacer gauges and handle drilling jigs slot into the same logic further down the line. Spacer gauges act as physical spacing references so drawer fronts sit with consistent gaps without measuring every gap individually. Handle drilling jigs repeat the same drilling position across doors and drawer fronts, which cuts repeated measuring and keeps handle lines consistent. Neither replaces a final check, but both remove the small accumulated errors that show up as a wonky run of handles.
Common Mistakes That Reintroduce Guesswork
The mistakes that bring guesswork back are rarely about the tools. They are about the sequence and the discipline around it.
Moving the laser mid-run is the most common. Once the beam has been set against a reference line, any adjustment to the laser invalidates every reading taken before it. Set it once and work to it.
Chasing the front edge and ignoring the rear is the second. The front is visible and the rear is not, so the rear gets adjusted by feel. Markers at the corners fix this because both ends get a visible reference.
Levelling each unit in isolation is the third. A cabinet can be dead level on its own and still sit wrong in the run. The joint line is what the customer sees.
Choosing the Right AlignPro Markers for Your Workflow
Match the marker to the work, not the other way round. For general kitchen fitting, cabinet installation and worktop runs, the standard AlignPro markers in Lightweight, Heavy Base or Magnetic cover the job. Pick the Lightweight for a kit you carry all day, the Heavy Base where markers are likely to get knocked, and the Magnetic where you are working around metal frames and brackets.

For floor levelling where the beam sits high, the TallBoy Heavy Base is the one built for it, with raised reference heights and a heavy base as standard.
“If you run multiple kitchens a month, the Trade Pack provides larger quantities of AlignPro markers. It is available in Lightweight, Heavy Base or Magnetic versions, with pack sizes of 50, 100 or 200. For a first purchase or occasional work, a single set is enough to test the method on your next install.
DeFrixo builds these tools in the United Kingdom and dispatches from Scotland, with 30-day returns on eligible items in accordance with its returns policy. If you are weighing up whether precision referencing earns its place in your van, start with one set and run it on a job you would otherwise level by eye. The difference shows up at the joint lines.
Some alignment errors become much more obvious once the units are fixed and the worktop is fitted, when correcting them can take considerably more time. DeFrixo makes precision installation tools designed to remove that guesswork before it reaches the joint line, including AlignPro markers with fixed reference lines, Heavy Base and Magnetic versions for different site conditions, and the TallBoy for floor levelling where standard markers cannot reach. Shop Laser Level Markers and get your next run level first time.
Frequently Asked Questions
How do I ensure my kitchen cabinets are perfectly level?
Set a datum line first, then work to it rather than adjusting each unit in isolation. Position your line laser so the beam crosses the same reference line on a marker placed at every cabinet corner you need to compare. Adjust each cabinet foot until the beam meets that same line on every marker. Finish with a spirit level check across the run, because markers support your reference points and do not replace the final verification.
What is the best way to use a line laser for cabinet installation?
Place your line laser at a convenient height and leave it untouched for the whole run. Put markers at the cabinet corners, then bring each corner onto the same reference line. The main gain is visibility: the laser is easy to see at the front of a cabinet but often hard to see at the rear, and markers give you a clear target at both ends. Check the finished run with a level before fixing anything permanently.
Do I need specialist jigs for cabinet assembly?
They help when you are assembling multiple carcasses. A cabinet assembly jig holds panels at 90 degrees while you join them and includes screw guide functionality, which reduces the chance of a panel shifting mid-fix. It does not guarantee a perfectly square finished cabinet, so check the assembly afterwards. For repeat work, the jig cuts the setup time on each carcass and keeps your joinery consistent.
How do I maintain consistent gaps when installing drawer fronts?
Use a physical spacing reference instead of measuring each gap individually. Drawer front spacer gauges sit between fronts so every gap matches without repeated tape work. Combine this with your laser reference for horizontal alignment, and check a few gaps with a tape once the run is set. Consistent gaps come from using the same reference every time, not from measuring more carefully.